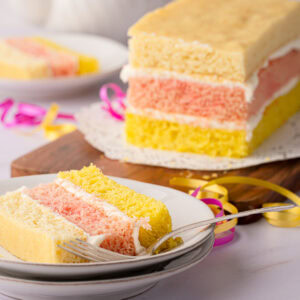
Angel Cake
This traditional British Angel Cake is made with three colourful layers of soft vanilla sponge, sandwiched together with a sweet vanilla buttercream. A nostalgic homemade bake that's perfect for birthdays, afternoon tea and any special occasions.
PRINT RECIPE
Servings: 8 slices
INGREDIENTS
For the Cake:
- 150 g Soft Margarine (or Butter) (at room temperature)
- 150 g Caster Sugar
- 3 Free-range Eggs (at room temperature; see Egg Size note below)
- ½ tsp Vanilla Extract
- 200 g Self-raising Flour (see Self-raising Flour note below)
- 1 tsp Baking Powder
- 1 tbsp Milk
- Pink & Yellow Food Colouring (gel food colouring preferred)
For the Buttercream:
- 50 g Block Margarine or Butter (softened)
- 110 g Icing Sugar
- Splash of Milk
EQUIPMENT
- Ruler or Measuring Tape
INSTRUCTIONS
For the Cake:
- Preheat your oven to 180°C (160°C for fan-assisted ovens, Gas Mark 4 or 350°F). Grease a 30×23cm (12×9 inches) baking tin with a little excess butter/margarine. Take a piece of greaseproof paper around 60×23cm (24×8 inches), fold it in half, measure 5cm in from the fold and create another fold at this point, then open the paper back up - these folds are where your middle sponge will be. Fold a pleat on either side of this middle section (a few centimetres high, around the depth of your tin). Place the greaseproof paper into your tin and fold the excess up the sides of your tin. Set aside.
- In a large bowl, cream the butter/margarine and sugar together until light and fluffy, in both colour and texture.
- Add the eggs one at a time, mixing until combined before adding the next. Don't worry if the mixture appears to curdle - this will remedy itself once the flour is added.
- Stir in the vanilla and milk. Sift in the flour and baking powder, and mix until you have a smooth batter and no dry flour specks remain.
- Evenly separate the batter into 3 bowls. Leave one bowl plain, and add a small amount of yellow and pink food colouring to the others. Mix until well combined - don't go too dark with food colouring, as the colour will intensify as it bakes.
- Spoon and spread the batter into the individual sections of your prepared cake tin. Bake in your preheated oven for 20-25 minutes, until risen and golden in colour, and a skewer inserted comes out clean.
- Remove from the oven and leave in the tin until cool enough to touch, then remove the cakes from the tin (using the greaseproof liner to help) and place on a wire cooling rack to cool completely.
- Once completely cool, prepare your buttercream.
Need a visual? You'll find step-by-step photos showing how to divide the tin in the full recipe post.
For even sponges, you can weigh the batter evenly between the bowls.
The batter may look quite thin in the tin, but don't worry - this is correct when using the recommended tin size. The sponges will rise as they bake and will be the right thickness once sandwiched together.
For the Buttercream:
- In a bowl, cream the butter/margarine and icing sugar to create a buttercream, adding a little milk to loosen it up to a spreadable consistency if required.
- Trim the edges of the cakes so they are all an even rectangular shape, and trim the tops of the yellow and pink sponges so they have a level finish.
- Spread half the buttercream icing on the top of the yellow cake layer before sandwiching the pink cake layer on top. Spread the remaining buttercream on the pink cake layer before sandwiching the plain cake layer on top.
IMPORTANT NOTE:
All my recipes are developed using a digital scale and the metric system (grams and millilitres). Cup measurements are available as a conversion, but these, unfortunately, won't always be as accurate. For best results, I always recommend baking with a digital scale.
RECIPE NOTES:
Egg Size: When it comes to eggs, I always buy mixed-weight free-range eggs. Generally speaking, egg size doesn't make a huge difference in most baking, unless you are using sizes that lean towards the extremes. If you're unsure which eggs to use, I recommend medium eggs in the UK, which are roughly equivalent to large eggs in the US. That's what this recipe has been tested with.
Self-raising Flour: Don't have self-raising flour? For this recipe, simply whisk together 200g (1½ cups) plain flour and 2¾ teaspoons baking powder instead - plus the additional 1 teaspoon of baking powder the recipe also calls for, so 3¾ teaspoons of baking powder in total. If you bake regularly, you can also make a larger batch to keep in your baking cupboard. For full instructions, cup conversions and answers to common questions, see my Self-raising Flour Ingredient Guide.
LIKE THIS RECIPE?
Leave a comment and rating below!