Chelsea Buns
Traditional homemade Chelsea Buns made with soft sweet dough, filled with currants, sultanas, brown sugar, and mixed spice, then finished with a sticky sugar glaze. A classic British bake that is perfect for afternoon tea, weekend baking, or a delicious bakery-style treat at home.
PRINT RECIPE
Servings: 12 buns
INGREDIENTS
For the Dough:
- 200 ml Milk
- 115 g Block Margarine or Butter
- 300 g Strong White Flour
- 250 g Plain Flour
- 140 g Caster Sugar
- 7 g Easy Bake Instant Yeast (usually one sachet)
- Zest of 1 Lemon
- 2 Free-range Eggs (at room temperature; beaten; see Egg Size note below)
For the Filling:
- 50 g Block Margarine or Butter (softened)
- 100 g Soft Light Brown Sugar
- 2 tsp Mixed Spice
- 100 g Currants
- 50 g Sultanas
For Glazing:
- 2 tbsp Caster Sugar
- 1 tbsp Hot Water
EQUIPMENT
- Small Saucepan
- 35 x 24cm (14 x 9½-inch) Baking Tin (or approx.)
INSTRUCTIONS
For the Dough:
- In a small pan, warm the milk & butter/margarine until the milk is lukewarm (not hot!) and the butter/margarine is melted.
- Meanwhile, sift the flours into a large bowl. Gently mix in the sugar, yeast and lemon zest to combine. Add the milk mixture and stir in a little before adding the eggs too. Mix until you have a soft, somewhat sticky dough.
- Transfer the dough to a lightly-floured surface and, using floured hands, knead for around 10 minutes, adding more flour as required.
- Place the dough into an oiled bowl (to prevent it from sticking) and cover with an oiled piece of cling film, or a damp tea towel. Leave to rise in a draught-free location for 1 hour, or until it has doubled in size.
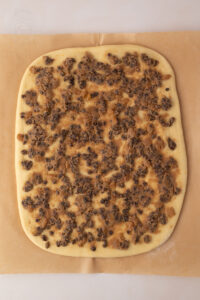
- Once your dough has doubled in size, turn it out onto a lightly floured surface and roll it into a rectangle about 40cm x 25cm using a rolling pin. It's important to make sure your dough is evenly thick all over to get nice, neat buns.
For the Filling:
- Line a large baking/roasting tin with greaseproof paper and set aside.
- In a small bowl, cream the butter/margarine, sugar, brown sugar and mixed spice. Add the dried fruits and mix until everything is coated and you have a somewhat clumpy mixture. Spoon the mixture evenly over your dough, and push it into the dough with your fingers.
- Roll the dough tightly & evenly, from the long side to the long side, to create a 45cm sausage. Cut the sausage into 12 individual buns. Arrange the buns in your pre-prepared tin, leaving space between each bun (they need room to grow!). Cover loosely with the oiled cling film or a damp tea towel.
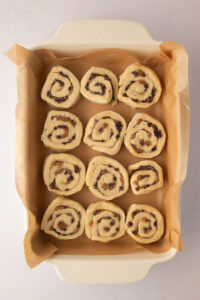
- Leave to rise in a warm place for around 1 hour until they look light and puffy.
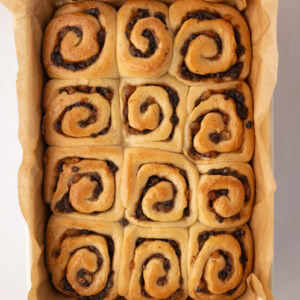
- After the buns have gone through their second rise, preheat your oven to 180°c (160°c for fan-assisted ovens, Gas Mark 4 or 350°F). Remove the cling film/tea towel, place the tray in the oven, and bake for around 20-25 minutes, until golden brown.
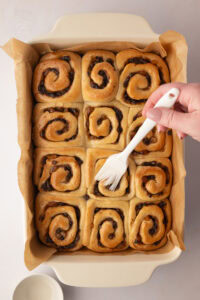
- While the buns are still warm, prepare the glaze by mixing the sugar and water, then brush the tops of the buns to create that shiny, sticky finish. Leave in the tray until cool enough to touch, then transfer to a wire rack to cool completely, or enjoy while still warm.
I use this 35cm x 24cm (17x9-inch) one.
I tend to cut the dough in half, then quarters and then those quarters into thirds, to make sure I get even buns. Alternatively you can try and weigh the dough and evenly divide from the total weight.
IMPORTANT NOTE:
All my recipes are developed using a digital scale and the metric system (grams and millilitres). Cup measurements are available as a conversion but these, unfortunately, won't always be as accurate. For best results, I always recommend baking with a digital scale.
NOTES
Egg Size:
When it comes to eggs, I always buy mixed-weight free-range eggs. Generally speaking, egg size doesn’t make a huge difference in most baking, unless you are using sizes that lean towards the extremes. If you're unsure which eggs to use, I recommend medium eggs in the UK, which are roughly equivalent to large eggs in the US. That's what this recipe has been tested with.Substitutions:
- Flour: I like a combination of Plain (All-purpose) and Strong flours when making a yeast dough for buns to get the best balance between softness and structure. You can, however, use just one or the other - your kneading and rising times, as well as overall texture, may vary slightly, though.
- Lemon Zest: I like to use some lemon zest in my dough, but orange zest works well too. Or, you can skip the zest completely and go for a plainer dough.
- Dried Fruit: Currants and sultanas are traditional in Chelsea Buns, but raisins can also be used if preferred. You can even use a mixture of all three to suit your own taste.
Storage:
Chelsea Buns are best enjoyed on the day they are baked, while still soft and fresh. Store any leftovers in an airtight container at room temperature for up to 3 days. You can also warm them slightly before serving to soften them back up.Freezing:
Chelsea Buns freeze well once baked and cooled. Wrap individually or store in a freezer-safe container for up to 3 months. Allow to defrost at room temperature and warm slightly before serving. Alternatively, you can freeze them before baking: after shaping and placing the buns into the tray, cover tightly and freeze before the second rise. Defrost fully in the fridge overnight, then allow them to come to room temperature and rise until light and puffy before baking.Tried this recipe?
Tag @bakingwithgranny or use the hashtag #bakingwithgranny!